Contents

Part 1: Exposure

  1. 1 Mastering the Exposure TriangleBalance aperture, shutter speed and ISO for brightness, depth, motion and noise.
  2. 2 ISO and image noiseWhen to raise ISO, why grain appears, and how to trade it for a faster shutter.
  3. 3 MeteringWhat the meter aims for, how to read it, the four metering modes, and Sunny 16 when there's no meter.
  4. 4 Shooting modes and the histogramLet the camera set one setting, steer it with exposure compensation, and check the result with the histogram and zebras.
  5. 5 Dynamic rangeHow many stops a camera can hold at once, what to keep when a scene is wider, and measured figures for real cameras.
  6. 6 Shutter speed and motionCamera shake, freezing or blurring a moving subject, and ND filters for long exposures.
  7. Part 1 cheat sheetFormulas and starting settings from chapters 1–6.
  8. Part 1 quizCheck yourself on chapters 1–6.

Part 2: Focus and depth

  1. 7 Camera LensLens anatomy and how to choose wide, standard, telephoto, prime, zoom and specialist lenses for real subjects.
  2. 8 Aperture and depth of fieldWhy a wider aperture blurs the background, what else controls blur, and the shape of bokeh.
  3. 9 Sensor size and crop factorWhat a smaller sensor crops, equivalent focal length and aperture, and why phones fake the blur.
  4. 10 Hyperfocal distanceSharp from here to infinity: focusing landscapes with blur circles, focus stacking and a cheat card.
  5. 11 Diffraction and the sharpest apertureWhy f/22 looks soft, where your lens is sharpest, and how pixel size changes it.
  6. Part 2 cheat sheetFormulas and starting settings from chapters 7–11.
  7. Part 2 quizCheck yourself on chapters 7–11.

Part 3: Composition

  1. 12 The composition reading planAll 15 chapters of The Elements of Composition, with printed page numbers and a photography lesson for each.
  2. 13 Introduction to compositionComposition as visual communication: choose what to show, compare three frames, and see how viewers read them.
  3. 14 What is composition?Arrange subject, space and edges to change what a photograph says; compare photos and make three versions of one scene.
  4. 15 Focal pointsChoose where the eye lands first, use contrast and space to build a visual path, then test thirds and diagonals in a field exercise.
  5. 16 LinesFollow straight, curved and implied lines through a photograph, then make three frames of one subject from different positions.
  6. 17 ShapesFind shapes made by subjects and space, use a frame within the frame, and compare three ways to place one subject.
  7. 18 TexturesMake a surface feel tangible with light, detail and context, then photograph one material three ways.
  8. 19 PatternsUse repetition to build rhythm, break a pattern to draw attention, and make three versions of one repeated scene.
  9. 20 SpaceUse positive and negative space, fill the frame, and simplify without losing meaning.
  10. 21 DepthLayer foreground, middle ground and background, and use perspective or deep space to show distance.
  11. 22 BalanceWeigh elements with symmetry, asymmetry and radial arrangements; explore the golden ratio as an optional guide.
  12. 23 ContrastCreate meaning and focus through contrasting subjects, light, shadows and colour.
  13. 24 ColorChoose hue, saturation and brightness, then compare complementary, triadic, analogous and monochromatic palettes.
  14. 25 ToneRead shadow, midtone and highlight; shape global and local tone while keeping meaningful detail.
  15. 26 AngleChange camera height and tilt to compare level, straight up or down, high and low viewpoints.
  16. 27 Composition conclusionBring the elements together in a four-frame story and develop your own way of seeing.

Part 4: Color Theory

  1. 28 Color Theory in PhotographyUse HSL, warm and cool depth, four color harmonies, white balance and selective editing to guide attention.
  2. 29 White balanceRead the color of light, match Kelvin and tint, and choose what to preserve when lights mix.

Tools

  1. Color wheelExplore hues, adjust saturation and luminosity, enter RGB or hex values, and preview the color live.
  2. Photo editorTry light, colour, detail and crop adjustments on a sample or your own photo, then save the result.
  3. Golden hour plannerSunrise, sunset, golden hour and blue hour for where you are, and where the sun rises and sets.
  4. ND filter calculatorYour shutter speed with an ND filter on, and a countdown timer for bulb mode.
  5. Depth of field calculatorHow much is sharp for your lens, aperture and focus distance, and the hyperfocal distance.
  6. Photo info and location removerSee a photo's camera settings and where it was taken, then remove the location before you share it.

Chapter 7Part 2: Focus and depth

Camera Lens

A lens decides how much of the scene fits in the frame, gathers light, and brings one distance into focus. Learn to read its markings and choose one for the photograph you want to make.

What happens inside a lens?

A camera lens gathers rays from each point of a scene and bends them toward the sensor. Several shaped elements, often arranged in groups, help bring the image into focus while reducing unwanted colour fringes, distortion and blur. The lens projects an image circle; the sensor records a rectangle inside it. Sensor size decides how much of that circle is captured. [2, 3]

Simplified cutaway of a camera lens Light enters at left, passes several glass elements and the diaphragm, and reaches the sensor at right. This is a conceptual diagram, not a specific optical design. SceneGlass groupsDiaphragmSensor
Conceptual ray path, not a blueprint: glass groups bend light; the diaphragm controls the opening; focus makes a chosen distance sharp at the sensor.

Optics and mechanics

The barrel holds the elements in alignment. A focus ring or autofocus motor moves a lens group to focus; in a zoom, moving groups change focal length. The mount attaches the lens and, on many systems, carries electronic signals. Some lenses add optical stabilisation, moving a group to counter camera shake. Stabilisation cannot freeze a moving subject. [3]

Why many pieces of glass?

One simple element cannot correct every optical error. Designers trade image quality against size, weight, cost and aperture. Curved and specially shaped elements can reduce aberrations; coatings and a hood help control stray light and flare. A perfectly corrected image is not everyone's goal: some photographers choose older lenses for lower contrast, glow or unusual flare. Test the particular lens rather than assuming all vintage glass behaves alike. [2, 6]

The parts you can handle

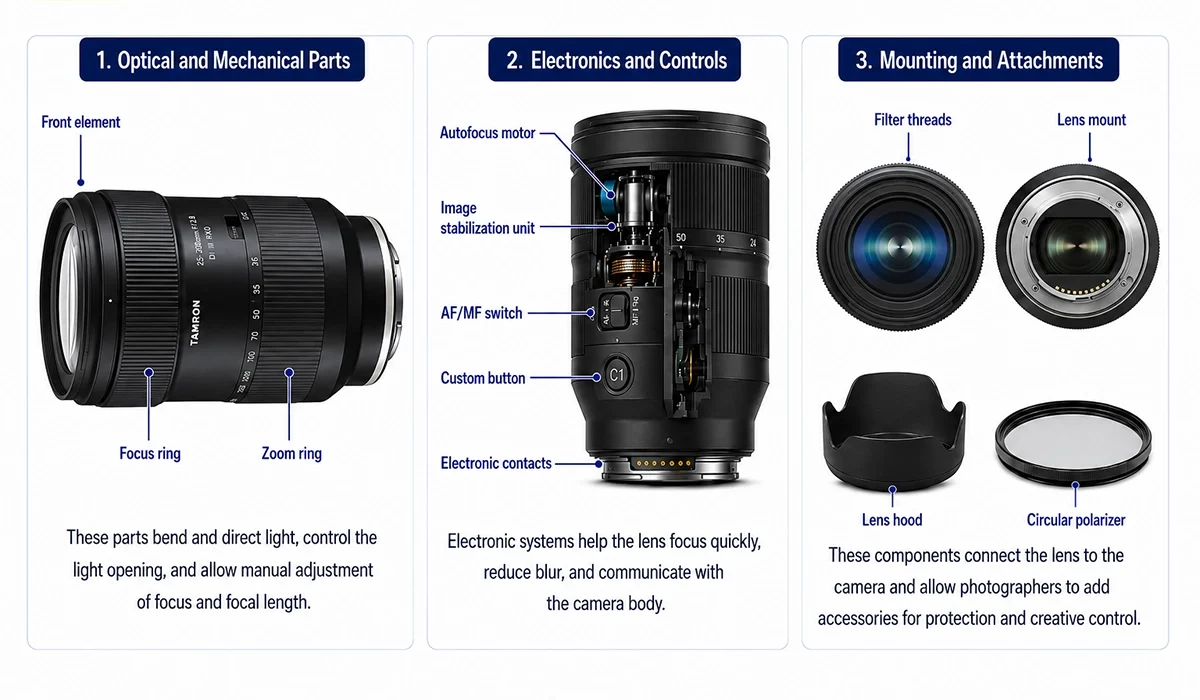
Three-panel Tamron infographic. Optical and mechanical parts: front element, focus ring, zoom ring. Electronics and controls: autofocus motor, image stabilisation unit, AF/MF switch, custom button, electronic contacts. Mounting and attachments: filter threads, lens mount, lens hood, circular polarizer.
Open the full-size infographic to inspect every label. On narrow screens, scroll sideways through the three panels. Infographic: Tamron Americas (AI). It is a teaching illustration; the layout and controls of a real lens vary by model. [3]

Front element, hood and filter thread. The front element admits light. A fitted hood blocks stray light; a threaded front accepts compatible filters. Some very wide lenses have a curved front and no ordinary front filter thread.

Zoom ring and focus ring. The zoom ring changes focal length by moving optical groups. The focus ring changes focus distance; on many autofocus lenses it sends an electronic command rather than mechanically moving the glass.

Switches, mount and contacts. A lens may offer AF/MF, stabilisation or focus-limit switches; some add custom buttons. The rear mount determines which camera bodies it fits; contacts share settings and lens data with the camera. Check the actual lens manual because controls differ. [3]

Focal length changes the view

Focal length is an optical property, marked in millimetres. With the camera in one place and the same sensor, a shorter focal length takes in a wider angle; a longer one records a narrower slice. Drag the slider or use its arrow keys. The diagram uses a rectilinear lens model, focused far away. [1]

50 mm

Same camera position. Full frame, 36 × 24 mm.

Horizontal field of view diagram A camera at the bottom points toward a distant scene. A wedge shows the view covered by the selected focal length. Camera

About 40° horizontally

Illustration of the angle from one fixed position. The shapes are landmarks, not a photograph or a simulation of perspective.

Read the millimetres

On full frame, 24 mm is wide, 50 mm is a standard view, and 200 mm is telephoto. A 24–70 mm zoom spans several views; a 50 mm prime stays at 50 mm. These labels are approximate. On APS-C, the same 50 mm lens frames more tightly because the smaller sensor crops the image circle; the lens itself has not become longer. [1] See the crop factor chapter.

Perspective comes from position

A long lens used from far away often shows a compressed relationship between near and far subjects. The change comes from where the camera stands. If you keep the camera fixed and crop a wide image to match a telephoto frame, the perspective remains the same. Step closer with a wide lens and nearby objects grow large relative to the background.

Aperture admits light; focus places sharpness

Overlapping diaphragm blades make an adjustable opening. The f-number is focal length divided by the effective opening diameter: at 50 mm, f/2 means an entrance pupil about 25 mm across. A smaller f-number admits more light and can give shallower depth of field. The maximum aperture printed on a lens is the widest it can open; a zoom might say f/3.5–5.6 because its maximum changes through the zoom range. [3]

Same focal length: f/2 has four times the opening diameter of f/8 and sixteen times its area, a four stop difference. Diagram is schematic.

What focusing moves

Focusing changes the lens's optical arrangement so rays from your chosen distance converge on the sensor. In many modern lenses, a motor moves internal elements. The camera may estimate which direction to move with phase detection, or search for peak image contrast; some systems combine both. Choose the eye for a portrait, and check it after the shot when depth of field is thin. [4]

Keep three causes of blur separate

  • Missed focus: the chosen subject is outside the sharp plane.
  • Shallow depth of field: other distances blur even when focus is correct.
  • Motion: the camera or subject moves during exposure. Optical stabilisation helps with camera movement, while a faster shutter helps with a moving subject.

Very small apertures also introduce diffraction softness.

The lens families, in three questions

A lens can have more than one label: a 90 mm macro may also be a prime and a short telephoto. First ask how wide it sees, then whether it zooms, then whether it has a special job. The focal lengths below are examples for a full-frame sensor, not rigid boundaries. On APS-C, use the crop factor to compare framing. [1, 10]

1. How much of the scene fits?

About 14–20 mm · full frame

Ultra-wide

Use it for: interiors, architecture, night skies and landscapes where you want a strong foreground. It fits more from one position.

Watch for: a tiny distant subject, stretched people near the edges and converging building lines if you tilt the camera up. A rectilinear ultra-wide aims to keep straight lines straight, though edge stretching can still be conspicuous. [11]

About 24–35 mm · full frame

Wide-angle

Use it for: street scenes, travel, environmental portraits and landscapes with both subject and setting. Move close when the foreground should feel prominent.

Watch for: faces becoming unflattering if you stand very close, and clutter slipping into the edges. Step back or use a longer lens for a tight headshot. [11]

About 40–60 mm · full frame

Standard

Use it for: everyday scenes, food, documentary work and learning composition. Around 50 mm on full frame, or 35 mm on APS-C, is a useful starting view.

Watch for: limited reach for distant subjects and limited room coverage in tight interiors. A standard prime makes you choose camera position deliberately. [12]

About 85–135 mm · full frame

Short telephoto

Use it for: portraits, stage details and isolating a subject from a busy background while standing at a comfortable distance. An 85 mm prime is a common portrait choice.

Watch for: needing more room to step back indoors. At wide apertures, the in-focus zone can be thin, so place focus carefully on the eye. [13]

About 200 mm and longer · full frame

Telephoto and super-telephoto

Use it for: wildlife, sports, aircraft and faraway details you cannot approach. A 70–200 mm zoom covers changing action; 400 mm and longer can fill the frame with small distant subjects.

Watch for: camera shake, fast subject motion, weight and heat shimmer over long distances. Stabilisation helps hand shake; moving subjects still need fast shutter speeds. The “compressed” look comes from the distant camera position used to keep a subject the same size. [13]

2. One focal length or many?

Prime

Anatomy: one fixed optical focal length, a focus mechanism and an aperture; no zoom ring. Many primes offer a wide maximum aperture, but this varies by model.

Use it when: you know the angle you want, value a particular size or aperture, or want a simple constraint for practice. A 35 mm prime is handy for life around you; an 85 mm prime gives room for portraits.

Tradeoff: to change framing substantially, move your camera or change lenses. Moving also changes perspective. [1, 12]

Zoom

Anatomy: a zoom ring or lever moves groups to change focal length; the lens still has a separate focusing mechanism. A 24–70 mm lens covers wide to short telephoto views.

Use it when: subjects move unpredictably or you cannot change position, as at events, travel stops or the edge of a sports field.

Tradeoff: maximum aperture may be constant, such as f/2.8, or vary through the range, such as f/3.5–5.6. Size and image quality depend on the particular design; “prime” alone does not mean sharper. [3]

Read the name before buying: “24–70 mm f/2.8” is a zoom with one stated maximum aperture; “18–55 mm f/3.5–5.6” has a smaller maximum opening at the long end. Neither number tells you its minimum focus distance, mount or sensor coverage. [3]

3. Does it have a special job?

Macro

Inside: a focusing design that reaches high magnification at close distances. At 1:1, a 10 mm subject projects 10 mm onto the sensor; a close-focusing ordinary zoom may reach only a fraction of that.

Use it for: insects, jewellery, textures and tiny product details. Check both maximum magnification and working distance, measured from the front of the lens to the subject. Minimum focus distance is measured from the sensor plane; it can sound generous while leaving little room for light or a live insect. [14]

Fisheye

Inside: an ultra-wide optical projection that deliberately curves many straight lines, unlike a rectilinear wide-angle design.

Use it for: an immersive, bent-horizon look, unusual interiors or dramatic action close to the lens. Keep a face away from the edge unless that distortion is intentional. The precise view depends on the lens and sensor coverage. [15]

Tilt-shift

Outside: controls move and rotate the optical assembly relative to the camera. The lens needs a larger image circle to allow shift.

Use shift for: architecture: keep the camera level, then move the frame upward within the image circle to include the top of a building without leaning verticals. Use tilt for: changing the orientation of the focus plane, useful when a plane of products or landscape detail recedes away from you. The two movements do different jobs. [8]

Anamorphic

Inside: optics record a horizontally squeezed image. A matching de-squeeze in the camera, monitor or edit restores its proportions; the final aspect ratio also depends on sensor area and cropping.

Use it for: a wide cinema frame or a particular rendering of highlights and edges. Flare streaks and oval bokeh vary by lens; they are not guaranteed. Check the lens's squeeze factor, sensor coverage and de-squeeze setting before filming. [9]
Choose for the photograph

  1. Choose the viewpoint first. Stand where the relationship between your subject and background looks right.
  2. Pick a focal length for framing. Go wide when you need to include more, or longer when you need a tighter frame from where you stand. Check the sensor format.
  3. Check light and focus needs. A wider maximum aperture helps in dim light and with strong background blur; close subjects need a sufficiently short minimum focus distance or high magnification. For handheld slow shutters, stabilisation may help.
  4. Check the fit. Confirm mount, sensor coverage, size and weight before buying or borrowing. Try the lens on the kind of subject you actually photograph. [3]

Field exercise: photograph one subject from a fixed position at your shortest, middle and longest focal lengths. Then make a fourth frame by walking closer with the short focal length. Compare what changed in framing and in the size of the background.

Sources and scope

The optical diagrams are original teaching illustrations; the lens anatomy infographic is from Tamron Americas and credited in its caption. Claims about products and optical behaviour are linked at the point of use.

  1. Sony NZ, “Understanding and choosing lenses” — focal length, prime/zoom and special lens categories.
  2. “Photographic lens design,” Wikipedia — overview of optical design tradeoffs and elements; checked against the manufacturer explanations below.
  3. Tamron Americas, “Camera Lenses Explained” — lens parts, focus drive, stabilisation, mount and markings.
  4. LOTS Vision, “How autofocus works” — basic phase and contrast detection.
  5. Atmega32-AVR.com, “Exploring Aperture Mechanics” — page unavailable during review; no claims rely on it. Aperture mechanics are supported by sources 2 and 3.
  6. Liquid Light Whisperer, “Vintage Lenses in Film Photography” — a photographer's examples of character and rendering, treated as subjective.
  7. “Lens barrel optomechanical design principles” (supplied PDF) — file unavailable in this workspace; no claims rely on it.
  8. Canon Hong Kong, “Use of Tilt-Shift Lens for Architectural and Landscape Photography” — shift and architecture.
  9. Film Equipment Hire, “Anamorphic Lenses Explained” — search indexed text available; direct page failed to open during review. Used for the basic squeeze explanation only.
  10. Sony NZ, “Lens basics” — angle of view and approximate lens categories.
  11. Sony NZ, “Wide-angle lenses” — uses and edge considerations.
  12. Sony NZ, “Standard lenses” — everyday uses and prime/zoom examples.
  13. Sony NZ, “Telephoto lenses” — portraits, wildlife and distant subjects.
  14. Sony NZ, “What is Macro Photography” — 1:1 magnification and working distance.
  15. Nikon, Capture NX 2 user manual, “Fisheye Lens” — distinguishes fisheye from rectilinear projection.
  16. Nikon USA, “Using Teleconverters” — focal length multiplier, light loss and compatibility limits.